


At university it is always a very time consuming work to create new assignments, and tests; especially when those tasks include drawing graphics.
In the field of structural engineering those small structures are a key part for teaching. For this reason I developed, in cooperation with the Institute for Structural Analysis at the Graz University of Technology, a TikZ library for Structural Analysis.
There are two different types of libraries available: one for 2D structures (structuralanalysis.sty) and one for 3D structures (3dstructuralanalysis.sty). In the following article only the 2D library will be discussed, but the principles and methods are the same for 3D structures.
Contents
- Principles
- Getting started
• Installation • LaTeX Environment - Elements
• Basic commands • Manual - Examples
• 2D Simplified Roof • 3D Support Construction - Downloads
Principles
TikZ is a very powerful tool; however, unfortunately not everyone is used to this part of LaTeX. Therefore, in addition to the creation of the library the second goal was to keep the usage as simple as possible. So that:
- anyone can use this library without (deeper) knowledge in TikZ
- skilled users can easily modify and customise the code
- the principle of this library can be used for any other library
Getting Started
Installation
Download the .sty file in the right directory and add it to the LaTeX file like:
\usepackage{structuralanalysis}
LaTeX Environment
Like every TikZ graph, needs also this library the
\begin{tikzpicture}
    ...
\end{tikzpicture}
Elements
Basic Commands
The library provides 10 different commands:
- \point
- \beam
- \support
- \hinge
- \load or \lineload and \temperature
- \internalforces
- \dimensioning
- \influenceline
- \notation
- \addon
For each element (command) are different options available. Obligatory options are marked with {curley brackets} and optional values are marked with [square brackets]. The first type is a must have criteria. In contrast, the optional input is not required to be entered.
An easy example is the following single force:
\load{type}{insertion point}[rotation][length or included angle][loaddistance];
Manual
More specific information about the elements and their options can be found in the manual. The manual is written in German, but section 1 provides a table with all elements and options; furthermore, the code is also given for each picture in the manual.
Examples
The easiest way to create a structure is the list above, starting with \point and ending with \addon.
The following examples shall give a first impression how drawings can be generated. In the manual both examples are explained in detail.
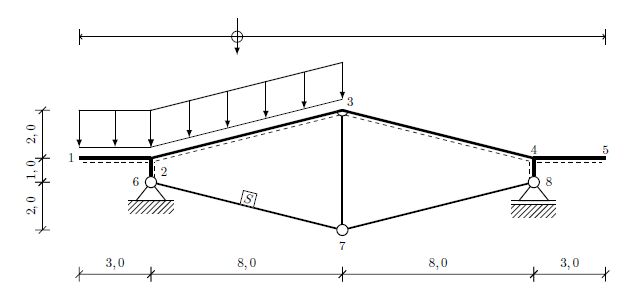
2D Simplified Roof
\begin{tikzpicture}
     \scaling{.65};

     \point{a}{0}{1};
     \point{b}{3}{1};
     \point{c}{11}{3};
     \point{d}{19}{1};
     \point{e}{22}{1};
     \point{f}{3}{0};
     \point{g}{11}{-2};
     \point{h}{19}{0};

     \beam{1}{a}{b}[0][1];
     \beam{1}{b}{c}[1][1];
     \beam{1}{c}{d}[1][1];
     \beam{1}{d}{e}[1][0];
     \beam{1}{f}{b};
     \beam{1}{d}{h};
     \beam{2}{f}{g};
     \beam{2}{g}{h};
     \beam{2}{g}{c};

     \support{1}{f};
     \support{2}{h};

     \hinge{1}{f};
     \hinge{1}{h};
     \hinge{1}{g};
     \hinge{2}{c}[b][d];

     \lineload{2}{a}{b}[1][1][.5];
     \lineload{2}{b}{c};

     \dimensioning{1}{a}{b}{-2.5}[$3,0$];
     \dimensioning{1}{b}{c}{-2.5}[$8,0$];
     \dimensioning{1}{c}{d}{-2.5}[$8,0$];
     \dimensioning{1}{d}{e}{-2.5}[$3,0$];
     \dimensioning{2}{f}{a}{-1}[$1,0$];
     \dimensioning{2}{g}{f}{-1}[$2,0$];
     \dimensioning{2}{a}{c}{-1}[$2,0$];

     \influenceline{a}{e}{3}[.3];

     \notation{1}{a}{$1$}[left];
     \notation{1}{b}{$2$}[below right=2mm];
     \notation{1}{c}{$3$};
     \notation{1}{d}{$4$}[above];
     \notation{1}{e}{$5$}[above];
     \notation{1}{f}{$6$}[left=2mm];
     \notation{1}{g}{$7$}[below=2mm];
     \notation{1}{h}{$8$}[right=2mm];
     \notation{4}{f}{g}[$S$];

\end{tikzpicture}
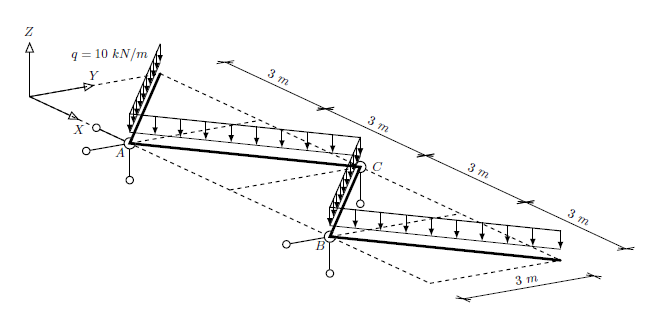
3D Support Construction
By using the library 3dstructuralanalysis, the following graph can be created in a very short time:
\setcoords{-25}{10}[1][1.2]
\setaxis{2}
%\showpoint
\begin{tikzpicture}[coords]

     \dpoint{a}{0}{0}{0};
     \dpoint{b}{3}{0}{0};
     \dpoint{c}{6}{0}{0};
     \dpoint{d}{9}{0}{0};
     \dpoint{e}{12}{0}{0};
     \dpoint{f}{0}{3}{0};
     \dpoint{g}{3}{3}{0};
     \dpoint{h}{6}{3}{0};
     \dpoint{i}{9}{3}{0};
     \dpoint{j}{12}{3}{0};

     \daxis{1}{a};

     \dbeam{1}{f}{b};
     \dbeam{1}{b}{h};
     \dbeam{1}{h}{d};
     \dbeam{1}{d}{j};
     \dbeam{3}{a}{e};
     \dbeam{3}{f}{j};
     \dbeam{3}{a}{f};
     \dbeam{3}{b}{g};
     \dbeam{3}{c}{h};
     \dbeam{3}{d}{i};
     \dbeam{3}{e}{j};

     \dsupport{1}{b};
     \dsupport{1}{h}[0][0];
     \dsupport{1}{d}[0];

     \dhinge{2}{b}[f][h][1];
     \dhinge{2}{h}[b][d][1];
     \dhinge{2}{d}[h][j][1];

     \dlineload{5}{0}{f}{b}[.5][.5][.11];
     \dlineload{5}{0}{b}{h}[.5][.5][.11];
     \dlineload{5}{0}{h}{d}[.5][.5][.11];
     \dlineload{5}{0}{d}{j}[.5][.5][.11];

     \ddimensioning{xy}{f}{g}{4.5}[$3~m$];
     \ddimensioning{xy}{g}{h}{4.5}[$3~m$];
     \ddimensioning{xy}{h}{i}{4.5}[$3~m$];
     \ddimensioning{xy}{i}{j}{4.5}[$3~m$];
     \ddimensioning{yx}{e}{j}{13}[$3~m$];

     \dnotation{1}{f}{$q=10~kN/m$}[above left=3mm];
     \dnotation{1}{b}{$A$}[below left];
     \dnotation{1}{h}{$C$}[right=2mm];
     \dnotation{1}{d}{$B$}[below left];

\end{tikzpicture}
Downloads
- Zip archive file with libraries, manuals and examples
- structuralanalysis.sty
- 3dstructuralanalysis.sty
- TikZ Library for Structural Analysis (Manual, PDF)
- TikZ Library for 3D Structural Analysis (Manual, PDF)
- example.tex and example.pdf