This article is an adapted translation of three French articles. Its licence is Creatives Commons By-Sa 2.0.
I spoke several times about the TikZ package, which makes creating vector drawings in LaTeX possible. I used it some time ago for creating a stemma of texts that I study, to visualize their mutual relationships. Now I explain how I made such a stemma with TikZ.
Contents
- General principles
- Simple stemma
Example • Basic code • Orientation • Superimposition problem • Line shape • Further on: define your own relationship’s style - Complex stemma
Example • Principle • Text layout • Node decoration • Linking texts • Refining - Conclusion
General principles
A stemma codicum is like a family tree of different manuscripts of a same text. By misuse of language, I will use stemma (without codicum) to designate a patterns of mutual relationships between several texts, and not only between several manuscripts.
In a dreamed situation, manuscripts would have between them only ascending vertical relationships: one manuscript “generates” one or more manuscripts, which generate, their turns, other manuscripts. There would be, in this case, a stemma without branches crossing, without consanguinity. I will call this stemma a “simple stemma”.
But often manuscripts or texts contaminate themselves, crossing, in one word, become consanguineous. It will be a “complex stemma”.
Then, a method for coding a stemma with TikZ depends on its complexity:
- If the stemma is simple, you “only” need code relationships between different manuscripts, writing successive generations. The stemma’s orientation (vertical or horizontal) will be indicated, and also a gap between “brother” manuscripts and between “parent” and “child” manuscripts.
- If the stemma is complex:
- You will position each manuscript on a grid.
- You will indicate relationships between those manuscripts.
Simple Stemma
How can you make a simple stemma, without crossing branches?
Example
You have six manuscripts of a same text. A generated B, C, D. E and F are generated from D.
Basic code
You need to load the TikZ package in the preamble. You insert the stemma with:
\begin{tikzpicture}
	\node {A}
		child { node {B}}
		child { node {C}}
		child { node {D}
			 child {
				node{E}
				}
			 child {
				node{F}
				}
			}
	;
\end{tikzpicture}

- Simple stemma example
- Line 1
- The
tikzpictureenvironment is the environment used to insert a TikZ figure. It can get many options to modify some aspects, such as default line thickness, text size, pattern orientation. See the documentation for more information. - Line 2
- A TikZ
node, marked by\nodecommand, is a text block. You could give options to this command, to modify some aspects, such as its text size. - Lines 3 and 4
childmeans here associating one child to a previous node. This child is a node too.- Lines 5 to 12
- Same as previous, except that the D node has two children, E and F. Note the number of curly brackets and their imbrications: that allows TikZ to correctly draw the stemma.
- Line 13
- After each TikZ path (here
\node), a semicolon is mandatory. - Line 14
- End of TikZ graphics.
Orientation
You can choose to direct your stemma differently, for example from right to left. For this, you give a grow option to the tikzpicture environment. This option can take one of these values:
upto have a stemma from bottom to top.downto have it from top to bottom.leftto have it from right to left.rightto have it from left to right.
So, to have a stemma from left to right:
\begin{tikzpicture}[grow=right]
	\node {A}
		child { node {B}}
		child { node {C}}
		child { node {D}
			 child {
				node{E}
				}
			 child {
				node{F}
				}
			}
	;
\end{tikzpicture}
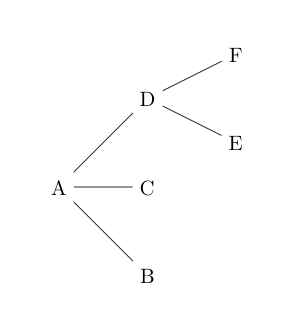
- Simple stemma from left to right
Superimposition problem
Now, suppose the C branch would have two children: G and H. So we write the next code:
\begin{tikzpicture}
	\node {A}
		child { node {B}}
		child { node {C}
			child {node{G}}
			child {node{H}}
			}
		child { node {D}
			 child {node{E}}
			 child {node{F}}
			}
	;
\end{tikzpicture}
And you obtain, after running LaTeX, the result below:
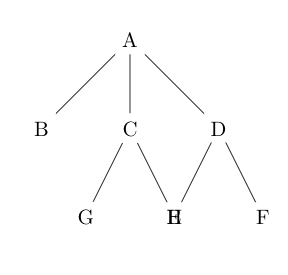
- Simple stemma with display problem
As you can see, there is a problem: C and D branches are superimposed. To avoid this, you can specify gap between A’s children, with the sibling distance option. And also between C’s children and D’s children. Write this option after each node:
\begin{tikzpicture}
	\node {A}[sibling distance=3cm]
		child { node {B}}
		child { node {C}[sibling distance=1.5cm]
			child {node{G}}
			child {node{H}}
			}
		child { node {D}[sibling distance=1.5cm]
			 child {node{E}}
			 child {node{F}}
			}
	;
\end{tikzpicture}
You get a correct result:
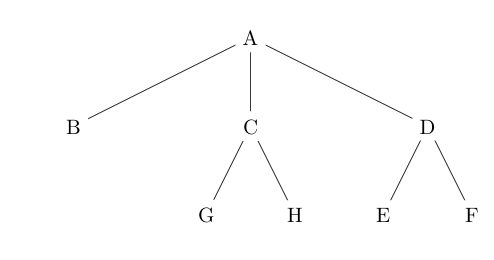
- Stemma with many children but without superimposition
If you sometimes need to define a gap between children for each node, most times you can only indicate a distance for each generation.
To do this, we will define level 1, level 2, level n style (with n corresponds to generation). This definition is made giving options to the tikzpicture environment.
So, in your case, you can simply write:
\begin{tikzpicture}[level 1/.style={sibling distance=3cm},level 2/.style={sibling distance=1.5cm}]
	\node {A}
		child { node {B}}
		child { node {C}
			child {node{G}}
			child {node{H}}
			}
		child { node {D}
			 child {node{E}}
			 child {node{F}}
			}
	;
\end{tikzpicture}
Line shape
You can define the shape of lines between nodes. For example, to get the next result:
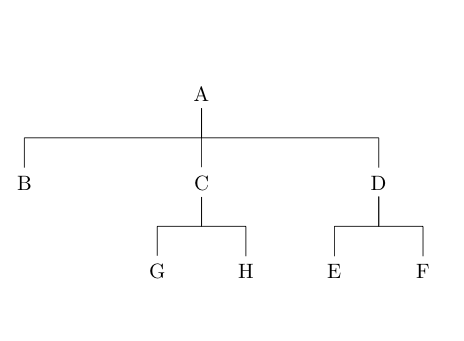
- Stemma with right angle linked manuscripts
This line’s style is not defined by default, but available after loading an additional TikZ module, with the \usetikzlibrary command in preamble. In this case, the module is called trees. So you load it with \usetikzlibrary{trees}.
To get this style, you only need to give a edge from parent fork down option to A node:
\begin{tikzpicture}[level 1/.style={sibling distance=3cm},level 2/.style={sibling distance=1.5cm}]
	\node {A}[edge from parent fork down]
		child { node {B}}
		child { node {C}
			child {node{G}}
			child {node{H}}
			}
		child { node {D}
			 child {node{E}}
			 child {node{F}}
			}
	;
\end{tikzpicture}
Obviously, if your tree is directed to right, you write right instead of down.
Further on: define your own relationship’s style
However, imagine that for C-G and C-H relationships, you want to have a single line. You only need to redefine the edge from parent path option for C node.
In my first article about TikZ, I explained how to draw a line between two points. The edge from parent path option has to contain a code telling to draw a line between a (\tikzparentnode) point and a (\tikzchildnode) point, respectively meaning parent element (here, C) and child element (here, G or H).
As you want a simple line, just write (\tikzparentnode) -- (\tikzchildnode). This gives:
\begin{tikzpicture}[level 1/.style={sibling distance=3cm},level 2/.style={sibling distance=1.5cm}]
	\node {A}[edge from parent fork down]
		child { node {B}}
		child { node {C}[edge from parent path={(\tikzparentnode) -- (\tikzchildnode)}]
			child {node{G}}
			child {node{H}}
			}
		child { node {D}
			 child {node{E}}
			 child {node{F}}
			}
	;
\end{tikzpicture}
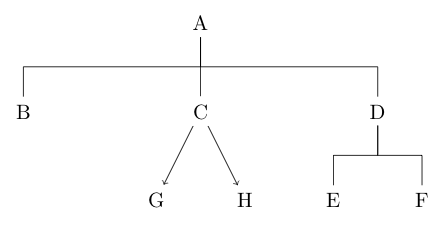
- Stemma with right angle, or not, linked manuscripts
Complex stemma
The TikZ’s trees system allow to easily draw simple stemmata, without branches’ crossing. But how can you do for more complex stemmata?
Example
The stemma that I am proposing now is a complex stemma related to apocryphal texts about Mary and Jesus childhoods. I am briefly explaining those texts and their relationships. I simplified problems put by the texts.
- In the second century, there’s a greek text: the Protevangelium of James. Aroud sixth-seventh century, the Gospel of Pseudo-Matthew, drawing on Protevangelium was written. In the eight century, the Libellus de Nativitate Mariae was written. The Libellus is based, especially, on the Pseudo-Matthew. These three texts are main branch of my stemma.
- A second branch, more complex, is linked to J compilation. J because its first editor was called James. It can be summed up as:
- An unknown text, called Special source, generates, in combination with the Pseudo-Matthew, a text called I compilation, which is ancestor of J Compilation. This I compilation is unknown to us, but we have some evidences which allow to piece it together again:
- In Irish apocryphal texts: the Liber Flavus Fergusiorum and the Leabhar Breac infancy narrative.
- In the J compilation, which is a combination of I compilation and the Gospel of Pseudo-Matthew.
- Original J compilation is lost, but we find it in two forms:
- Arundel form, which incorporates other elements of the Gospel of Pseudo-Matthew.
- Hereford form, which incorporates elements of the Libellus de Nativitate Mariae and of a pseudo-augustinian sermon App. 195.
- An unknown text, called Special source, generates, in combination with the Pseudo-Matthew, a text called I compilation, which is ancestor of J Compilation. This I compilation is unknown to us, but we have some evidences which allow to piece it together again:
This is quite complex, that’s why we would like draw the next stemma:
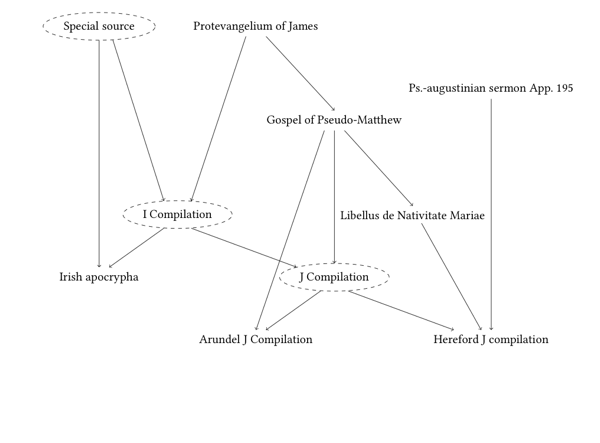
- Stemma of texts relating to Mary and Jesus childhoods. Surrounded texts are conjectured by scholars.
Principle
We will position the different texts on a grid. The position of each text will get a unique identifier. We will indicate to LaTeX how to link positions.
The grid on which our texts are put use Cartesian coordinates: one x axis and one y axis. Be careful about directions: x axis is from left to right and y axis is from bottom to top.

- Coordinate system in TikZ
The vertical axis will be plus or minus equivalent to the time axis, but the horizontal axis will have no particular meaning.
Text layout
Now, we will draw our stemma. Let’s firstly position the texts.
\begin{tikzpicture}
\node (Spe) at (0, 0) {Special source};
\node (PJ) at (5, 0) {Protevangelium of James};
\node (PM) at (7.5, -3) {Gospel of Pseudo-Matthew};
\node (I) at (2.5,-6) {Compilation~I};
\node (195) at (12.5, -2) {Ps.-augustinian sermon App.~195};
\node (DNM) at (10, -6) {Libellus de Nativitate Mariae};
\node (J) at (7.5,-8) {Compilation~J};
\node (JAr) at (5, -10) {Compilation~J Arundel};
\node (JHer) at (12.5, -10) {Compilation~J Hereford};
\node (Ir) at (0, -8) {Irish apocrypha};
\end{tikzpicture}
Each instruction of TikZ here has this pattern: \node (label) at (coordinates) {Text} ;. Then, the label of each \node allows to link to it. As I have said before, coordinates are Cartesian. The \node command is a basic command of TikZ. It defines a node, that means a point where text is written.
The result is:

- First try of text layout
Nodes are correctly set concerning their relations, but take up too many space. We have two possible solutions:
- To change every coordinate.
- To tell to the
tikzpictureenvironment to “zoom out”, thanks toscaleparameter. This parameter specifies a zoom level. Its default value is1. We will set it to0.9, to have a final figure size with 90 % of the initial figure size.
It gives:
\begin{tikzpicture}[scale=0.9]
\node (Spe) at (0, 0) {Special source};
\node (PJ) at (5, 0) {Protevangelium of James};
\node (PM) at (7.5, -3) {Gospel of Pseudo-Matthew};
\node  (I) at (2.5,-6) {I~Compilation};
\node (195) at (12.5, -2) {Ps.-augustinian sermon App.~195};
\node (DNM) at (10, -6) {Libellus de Nativitate Mariae};
\node  (J) at (7.5,-8) {J~Compilation};
\node (JAr) at (5, -10) {Arundel J~Compilation};
\node (JHer) at (12.5, -10) {Hereford J~compilation};
\node (Ir) at (0, -8) {Irish apocrypha};
\end{tikzpicture}

- Text layout with
scale=0.9
You can notice that the scale is applied to distances between texts. On the other hand, the text size is the same. It’s an essential property of the scale option: it applies only to coordinates, not to text size or to orientation.
To reduce the text size, put the small command into the tikzpicture environment.
\begin{tikzpicture}[scale=0.9]
\small
\node (Spe) at (0, 0) {Special source};
\node (PJ) at (5, 0) {Protevangelium of James};
\node (PM) at (7.5, -3) {Gospel of Pseudo-Matthew};
\node  (I) at (2.5,-6) {I~Compilation};
\node (195) at (12.5, -2) {Ps.-augustinian sermon App.~195};
\node (DNM) at (10, -6) {Libellus de Nativitate Mariae};
\node  (J) at (7.5,-8) {J~Compilation};
\node (JAr) at (5, -10) {Arundel J~Compilation};
\node (JHer) at (12.5, -10) {Hereford J~compilation};
\node (Ir) at (0, -8) {Irish apocrypha};
\end{tikzpicture}

- Text layout withs
scale=0.9and\smallsize
Node decoration
We would like that nodes corresponding to conjectured texts are surrounded by dashed ellipses.
Basic shapes of TikZ are pretty simple. To add complex shapes, you need load an supplementary module in the preamble, with the \usetikzlibrary command:
\usetikzlibrary{shapes}
In the next text, we will define a node style, with the \tikzstyle command. This style is called conjecture:
\tikzstyle{conjecture}=[draw,ellipse,dashed]
The draw option means that node’s border will be drawn, dashed and with elliptic shape. It remains to put the conjecture style as option in some nodes, just after the \node command:
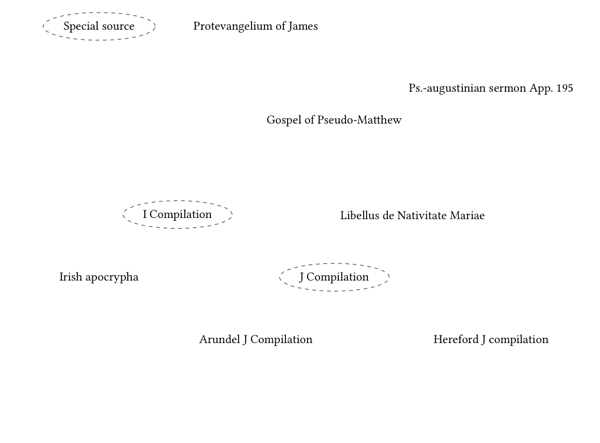
- Surrounded conjectured texts
\begin{tikzpicture}[scale=0.9]
\tikzstyle{conjecture}=[draw,ellipse,dashed]
\small
\node[conjecture] (Spe) at (0, 0) {Special source};
\node (PJ) at (5, 0) {Protevangelium of James};
\node (PM) at (7.5, -3) {Gospel of Pseudo-Matthew};
\node[conjecture]  (I) at (2.5,-6) {I~Compilation};
\node (195) at (12.5, -2) {Ps.-augustinian sermon App.~195};
\node (DNM) at (10, -6) {Libellus de Nativitate Mariae};
\node[conjecture]  (J) at (7.5,-8) {J~Compilation};
\node (JAr) at (5, -10) {Arundel J~Compilation};
\node (JHer) at (12.5, -10) {Hereford J~compilation};
\node (Ir) at (0, -8) {Irish apocrypha};
\end{tikzpicture}
Linking texts
The \draw command enables to link nodes you have defined before, for example the Spe node with the I node. Basic syntax is \draw[options] (node) -- (node). Options allow, notably, to tell lines styles. Here, you will put the -> option to tell that you want to have arrows.
\begin{tikzpicture}[scale=0.9]
\tikzstyle{conjecture}=[draw,ellipse,dashed]
\small
\node[conjecture] (Spe) at (0, 0) {Special source};
\node (PJ) at (5, 0) {Protevangelium of James};
\node (PM) at (7.5, -3) {Gospel of Pseudo-Matthew};
\node[conjecture]  (I) at (2.5,-6) {I~Compilation};
\node (195) at (12.5, -2) {Ps.-augustinian sermon App.~195};
\node (DNM) at (10, -6) {Libellus de Nativitate Mariae};
\node[conjecture]  (J) at (7.5,-8) {J~Compilation};
\node (JAr) at (5, -10) {Arundel J~Compilation};
\node (JHer) at (12.5, -10) {Hereford J~compilation};
\node (Ir) at (0, -8) {Irish apocrypha};
\draw[->] (Spe) -- (I);
\draw[->] (PJ) -- (PM);
\draw[->] (PJ) -- (I);
\draw[->] (I)	-- (J);
\draw[->] (I) -- (Ir);
\draw[->] (DNM) -- (JHer);
\draw[->] (195) -- (JHer);
\draw[->] (Spe) -- (Ir);
\draw[->] (PM) -- (JAr);
\draw[->] (PM) -- (DNM);
\draw[->] (PM) -- (J);
\draw[->] (J) -- (JAr);
\draw[->] (J) -- (JHer);
\end{tikzpicture}
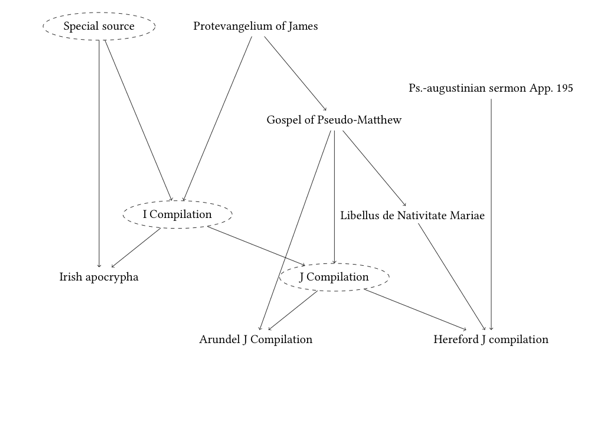
- Linked texts
Refining
Your stemma is built. But you can improve it. Arrows are not every time shaped in an elegant way, sometime they are too near to texts.
For drawing line between nodes, TikZ does by default:
- It draws lines between node centers.
- It hides lines inside nodes.
However, you can tell to TikZ to link into a specific position of node’s border. To do this, you just need indicate an angle, in degrees, knowing that 0 degree means right of the node, and that you turn anticlockwise (trigonometric direction), as it’s explained in the drawing below:

- Anchor at nodes border. Yellow are means node’s content, then black points are in node’s border.
To tell you want 60 position of A node to be linked with 40 position of B node, you just need use next syntax:
\draw[options] (A. 60) -- (B. 40);
After some tries, you can have a satisfactory positioning, for example:
\begin{tikzpicture}[scale=0.9]
\tikzstyle{conjecture}=[draw,ellipse,dashed]
\small
\node[conjecture] (Spe) at (0, 0) {Special source};
\node (PJ) at (5, 0) {Protevangelium of James};
\node (PM) at (7.5, -3) {Gospel of Pseudo-Matthew};
\node[conjecture]  (I) at (2.5,-6) {I~Compilation};
\node (195) at (12.5, -2) {Ps.-augustinian sermon App.~195};
\node (DNM) at (10, -6) {Libellus de Nativitate Mariae};
\node[conjecture]  (J) at (7.5,-8) {J~Compilation};
\node (JAr) at (5, -10) {Arundel J~Compilation};
\node (JHer) at (12.5, -10) {Hereford J~compilation};
\node (Ir) at (0, -8) {Irish apocrypha};
\draw[->] (Spe. -45) -- (I. 135);
\draw[->] (PJ.-45) -- (PM.90);
\draw[->] (PJ.-135) -- (I.45);
\draw[->] (I.-45)       -- (J.165);
\draw[->] (I.-135) -- (Ir.45);
\draw[->] (DNM.-45) -- (JHer.135);
\draw[->] (195.-90) -- (JHer.90);
\draw[->] (Spe.-90) -- (Ir.90);
\draw[->] (PM.-135) -- (JAr.90);
\draw[->] (PM.-45) -- (DNM.90);
\draw[->] (PM.-90) -- (J.90);
\draw[->] (J.-135) -- (JAr.45);
\draw[->] (J.-45) -- (JHer. 165);
\end{tikzpicture}
It makes:

- Stemma of texts relating to Mary and Jesus childhoods. Surrounded texts are conjectured by scholars.
Conclusion
I hope this article could help your to made a simple or a complex stemma. Thanks to Stefan Kottwitz for asking me to translate it, and thanks to him for correcting my English.


