


In previous posts I discussed the glossaries package (which can be extended with the glossaries-extra package) and also using makeindex or xindy to sort the terms that had been indexed in the document. This post describes another tool, bib2gls, which can be used instead of makeindex or xindy.
Makeindex and xindy are both general purpose indexing applications, but bib2gls was designed specifically for use with glossaries-extra and works in a very different way. With makeindex and xindy, commands like \gls add indexing information to an external file. This information consists of the sort value, hierarchical information (if the term has a parent entry), the associated formatting code to display the entry in the glossary and the location (normally the page number) where the indexing occurred. The indexing application sorts and collates this information and writes all the code needed to format the glossary in another file, which is input by \printglossary.
By contrast, bib2gls doesn’t create a file containing the code to typeset the glossary. Instead, it parses bib files containing definitions of terms, symbols and abbreviations, then selects the entries that are required by the document and writes the LaTeX code (using commands provided by glossaries-extra.sty) that defines these terms in a file that’s input by the preamble-only command \GlsXtrLoadResources. All the indexing information (such as the locations) is stored in internal fields associated with each entry. If a glossary is required, it can be displayed with \printunsrtglossary (or \printunsrtglossaries, which does \printunsrtglossary for each defined glossary).
This means that you can have a large database of all entries defined in a bib file (or across multiple bib files) that can be managed in an application such as jabref. If you have a document that only requires, say, 10 from a database of 1000 entries, then LaTeX only needs to use the resources required to define those 10 entries, which can improve the document build time.
\printunsrtglossary
The \printunsrtglossaries command was briefly mentioned in an earlier post. When using bib2gls it helps to understand how \printunsrtglossary works. The “unsrt” part of the name stands for “unsorted” because this command simply iterates over all defined entries in the order in which they were defined. There is no attempt to sort entries or gather child entries, although letter group headings are inserted whenever a change in group is detected. As was previously illustrated, this can cause strange results. Consider the following example:
\documentclass{article}

\usepackage[style=indexgroup]{glossaries-extra}

\newglossaryentry{parrot}{name={parrot},
  description={mainly tropical bird with bright plumage}
}

\newglossaryentry{armadillo}{name={armadillo},
  description={nocturnal insectivore with large claws}
}

\newglossaryentry{zebra}{name={zebra},
  description={wild African horse with black-and-white stripes}
}

\newglossaryentry{duck}{name={duck},
  description={a waterbird with webbed feet}
}

\newglossaryentry{aardvark}{name={aardvark},
  description={nocturnal African burrowing mammal}
}

\newglossaryentry{macaw}{name={macaw},
 parent={parrot},
 description={long-tailed, colourful parrot}
}

\newglossaryentry{mallard}{name={mallard},
 parent={duck},
 description={dabbling duck with long body and broad bill}
}

\newglossaryentry{ara}{name={Ara},
 parent={macaw},
 description={neotropical genus of macaw}
}

\newglossaryentry{northernpintail}{name={northern pintail},
 parent={duck},
 description={long-necked, small-headed duck with curved back}
}

\newglossaryentry{anodorhynchus}{name={Anodorhynchus},
 parent={macaw},
 description={genus of large blue macaws}
}

\begin{document}
\printunsrtglossary
\end{document}
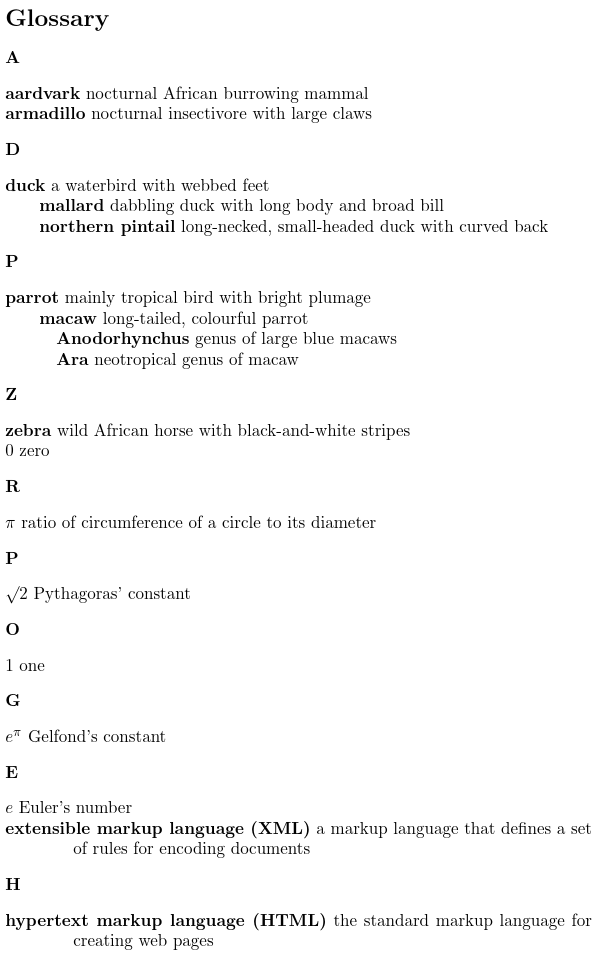
This produces a strange result (click to view larger version).
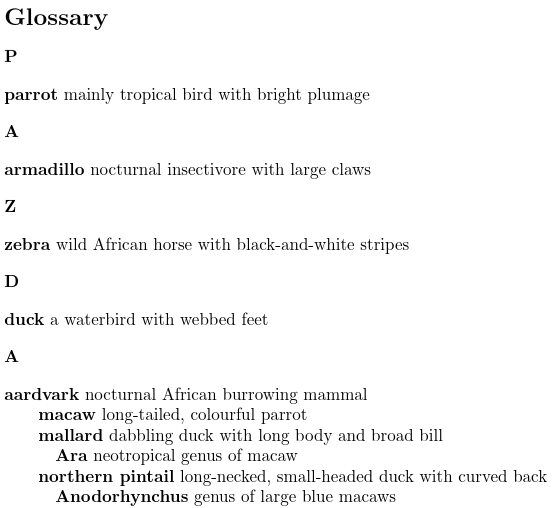
The list is in the order of definition. The parent key simply provides the hierarchical level for the benefit of the glossary style. The level starts at 0 for top-level (parentless) entries, then 1 for an entry that has a parent but no grandparent, 2 for an entry with a grandparent but no great-grandparent, etc. The glossary style may (or may not) apply a different format for entries according to their hierarchical level. In the case of the indexgroup style used here, different indenting is applied. In this example, this has led to a rather strange visual appearance that makes it look as though “macaw”, “mallard” and “northern pintail” are sub-items of “aardvark”, and the macaw genera appear to be sub-items of “mallard” and “northern pintail”.
The default behaviour of bib2gls is to hierarchically sort all the required entries before writing them to the file that’s input by \GlsXtrLoadResources. This means that \printunsrtglossary should then list them in an appropriate order.
While \printunsrtglossary iterates over all the entries for the given glossary, it inserts the group headers as follows:
- If the current entry doesn’t have a parent, then:
- find the group label associated with the current entry
- if the group label is different to the previous group label then:
- if there’s no previous group label just insert
\glsgroupheading{label} - if there is a previous group label insert
\glsgroupskip\glsgroupheading{label}
- if there’s no previous group label just insert
The way the group label is obtained depends on the glossaries-extra package options and on bib2gls settings. Whether or not the group heading is actually displayed depends on the glossary style. Some styles simply redefine \glsgroupheading to do nothing (but \glsgroupskip may still create a vertical space).
Switching to bib2gls
Let’s rewrite the above example so that it uses bib2gls. The first thing that needs to be done is to create a bib file that contains all the entry definitions. If you already have an existing .tex file that contains all your entries then bib2gls comes with a convenient command-line application called convertgls2bib, which can parse a .tex file for commands like \newglossaryentry and \newabbreviation and create a bib file suitable for use with bib2gls. For example, if the above document is contained in the file myDoc.tex then run the following from a command prompt:
convertgls2bib -p myDoc.tex entries.bib(The -p switch indicates that convertgls2bib should only parse the document preamble.) This will create the file entries.bib that contains the following:
% Encoding: UTF-8
@entry{parrot,
  name = {parrot},
  description = {mainly tropical bird with bright plumage}
}

@entry{armadillo,
  name = {armadillo},
  description = {nocturnal insectivore with large claws}
}

@entry{zebra,
  name = {zebra},
  description = {wild African horse with black-and-white stripes}
}

@entry{duck,
  name = {duck},
  description = {a waterbird with webbed feet}
}

@entry{aardvark,
  name = {aardvark},
  description = {nocturnal African burrowing mammal}
}

@entry{macaw,
  parent = {parrot},
  name = {macaw},
  description = {long-tailed, colourful parrot}
}

@entry{mallard,
  parent = {duck},
  name = {mallard},
  description = {dabbling duck with long body and broad bill}
}

@entry{ara,
  parent = {macaw},
  name = {Ara},
  description = {neotropical genus of macaw}
}

@entry{northernpintail,
  parent = {duck},
  name = {northern pintail},
  description = {long-necked, small-headed duck with curved back}
}

@entry{anodorhynchus,
  parent = {macaw},
  name = {Anodorhynchus},
  description = {genus of large blue macaws}
}
The definitions now need to be removed from myDoc.tex and the record package option is required. The stylemods option is also useful (but not essential). This will load the glossaries-extra-stylemods package, which modifies the predefined styles provided by glossaries.sty to make them easier to adjust and also to make them integrate better with bib2gls.
\usepackage[record,stylemods,style=indexgroup]{glossaries-extra}
The \GlsXtrLoadResources command is also required. This writes information to the aux file for the benefit of bib2gls as well as inputting the file created by bib2gls (if it exists). By default, bib2gls will only select entries that have been indexed in the document (using commands like \gls) and any dependent entries. In this example, I want to select all entries that have been defined in my entries.bib file, which means I need to use the selection=all option.
\GlsXtrLoadResources[src=entries,selection=all]
The src option indicates the name or names of the bib files where the entry data is defined. In this case, there’s only one file. If I have additional files, they need to be specified in a comma-separated list. Note that this means that braces will be required to prevent the comma from being parsed as part of the key=value list. For example, if I also have entries in the file abbreviations.bib, then I would need:
\GlsXtrLoadResources[src={entries,abbreviations},selection=all]
The complete document is now:
\documentclass{article}

\usepackage[record,stylemods,style=indexgroup]{glossaries-extra}

\GlsXtrLoadResources[src=entries,selection=all]

\begin{document}
\printunsrtglossary
\end{document}
The document build process is similar to using makeglossaries, but bib2gls is used instead:
pdflatex myDoc
bib2gls myDoc
pdflatex myDoc
(Alternatively, use xelatex etc instead of pdflatex.) This produces the glossary shown below:
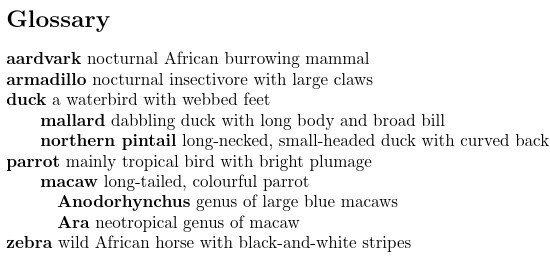
The ordering is now correct: aardvark, armadillo, duck (with sub-entries mallard and northern pintail), parrot (with sub-entry macaw that has sub-entries Anadorhynchus and Ara) and zebra. However, there are no letter group headings, even though the indexgroup style has been used. This is because bib2gls doesn’t set the group labels by default (not all glossaries require them). If you need the glossary separated into letter groups then you should instruct bib2gls to set the group labels using the --group (or -g) switch:
pdflatex myDoc
bib2gls --group myDoc
pdflatex myDoc
If you are using arara you need to add the following lines to your document:
arara: pdflatex
arara: bib2gls: { group: on }
arara: pdflatex
(For other ways of integrating bib2gls into your document build see Incorporating makeglossaries or makeglossaries-lite or bib2gls into the document build.) With the --group switch, the glossary now looks like:
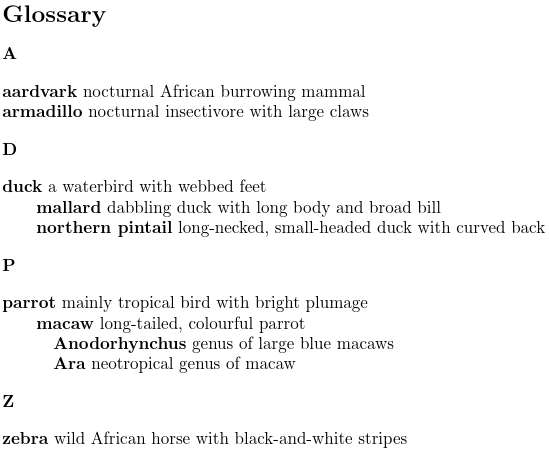
Naturally you also need to use a glossary style that supports groups.
If the document source is in the file myDoc.tex then bib2gls will create a file called myDoc.glstex that corresponds to the first \GlsXtrLoadResources command. If there are multiple instances of this command then myDoc-1.glstex will correspond to the second \GlsXtrLoadResources, myDoc-2.glstex will correspond to the third \GlsXtrLoadResources etc. These files simply contain LaTeX code and so can be inspected in a text editor.
In order to make it easier to perform minor adjustments, the glstex files provide wrapper commands. For example, terms that are defined with @entry in the bib file are defined in the glstex file using \bibglsnewentry, which has the definition provided before the first instance of its use:
\providecommand{\bibglsnewentry}[4]{%
\longnewglossaryentry*{#1}{name={#3},#2}{#4}%
}
This uses \longnewglossaryentry* instead of \newglossaryentry to allow for paragraph breaks in the description. If you try the above example document and look at the glstex file, you will see the entry definitions. These include the sort key for informational purposes. If you’re not sure why bib2gls ordered the entries a certain way, checking the sort key in the glstex file can show you the value used by the selected bib2gls sort method. For example, the “northern pintail” entry is defined in the glstex file as follows:
\bibglsnewentry{northernpintail}%
{parent={duck},
sort={northern|pintail|}}%
{northern pintail}%
{long-necked, small-headed duck with curved back}
Note that the sort value is northern|pintail| because the default sort method is a locale-sensitive word sort that discards spaces and (some) punctuation and marks up the end of each word with a marker (the pipe character | by default). Any remaining non-letter characters may by ignored by the comparison function (the comparator). This is appropriate for entries where the name is a word or phrase but may not be appropriate for other types of entries, such as symbols.
Sort Fallbacks
In general, you typically shouldn’t set the sort field in the bib file, but instead use bib2gls’s fallback system to choose the most appropriate field. If the sort field is explicitly set then the fallback isn’t used. The fallback depends on the entry type used in the bib file. For example, if a term was defined in the bib file using @entry then the sort fallback is obtained from the name field. However, if the term was defined using @symbol (or @number) then the sort fallback is obtained from the label, and if the term was defined using @abbreviation (or @acronym) then the sort fallback is obtained from the short field
Suppose now that in addition to my entries.bib file described above, I also have a file called abbreviations.bib that contains:
% Encoding: UTF-8

@abbreviation{xml,
 short={XML},
 long={extensible markup language},
 description={a markup language that defines a set of rules for
    encoding documents}
}

@abbreviation{html,
  short={HTML},
  long={hypertext markup language},
  description={the standard markup language for creating web pages}
}
and a file called constants.bib that contains:
% Encoding: UTF-8

@number{pi,
  description={ratio of circumference of a circle to its diameter},
  name={\ensuremath{\pi}},
  user1={3.14159}
}

@number{e,
  description={Euler's number},
  name={\ensuremath{e}},
  user1={2.71828}
}

@number{root2,
  description={Pythagoras' constant},
  name={\ensuremath{\surd2}},
  user1={1.41421}
}

@number{gelfondscons,
  description={Gelfond's constant},
  name={\ensuremath{e^\pi}},
  user1={23.140692}
}

@number{zero,
  description={zero},
  name={\ensuremath{0}}
}

@number{one,
  description={one},
  name={\ensuremath{1}}
}
I can now modify my document as follows:
\documentclass{article}

\usepackage[record,stylemods,style=indexgroup]{glossaries-extra}

\setabbreviationstyle{long-short-desc}
\GlsXtrLoadResources[src={entries,abbreviations,constants},selection=all]

\begin{document}
\printunsrtglossaries
\end{document}
Note that I have to set the abbreviation style before \GlsXtrLoadResources. This produces the following glossary: The sort value for the mathematical constants has been obtained from the label. For example, Pythagoras’ constant has the label
 root2 and so ends up in the “R” letter group, whereas π (which has the label pi) is in the “P” letter group. The sort value for the extensible markup language (XML) term has been obtained from the short field (XML) so it ends up in the “X” letter group. The fallback values can be changed. For example:
\documentclass{article}

\usepackage[record,stylemods,style=indexgroup]{glossaries-extra}

\setabbreviationstyle{long-short-desc}
\GlsXtrLoadResources[src={entries,abbreviations,constants},
 abbreviation-sort-fallback=long,
 symbol-sort-fallback=description,
 selection=all]

\begin{document}
\printunsrtglossaries
\end{document}
This will now use the long field as the fallback for abbreviations (@abbreviation or @acronym) and the description field as the fallback for symbols (@symbol or @number).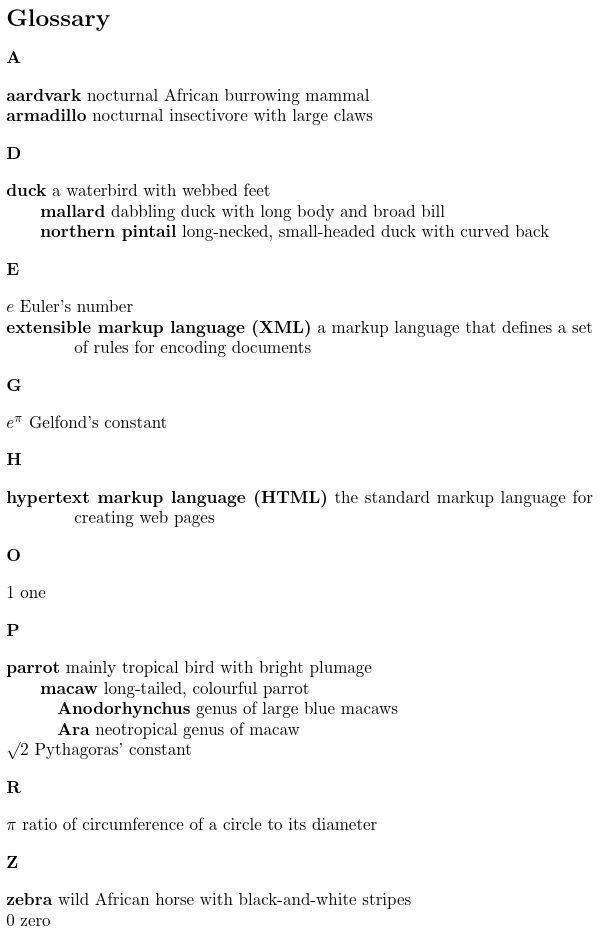 The “extensible markup language (XML)” entry is now in the “E” letter group and Pythagoras’ constant is now in the “P” letter group, but π (pi) is now in the “R” letter group.
Sub-Blocks
I’m now going to make a strange modification to the above document:
\documentclass{article}

\usepackage[record,stylemods,style=indexgroup]{glossaries-extra}

\setabbreviationstyle{long-short-desc}
\GlsXtrLoadResources[src={entries},selection=all]

\GlsXtrLoadResources[src={constants},
 sort={en-reverse},
 symbol-sort-fallback=description,
 selection=all]

\GlsXtrLoadResources[src={abbreviations},
 abbreviation-sort-fallback=long,
 selection=all]

\begin{document}
\printunsrtglossary
\end{document}
This splits the data in the three bib files into three separate resource commands (\GlsXtrLoadResources).
The first \GlsXtrLoadResources selects all the terms defined in entries.bib and sorts them according to my locale (since there’s no language set in the document) which happens to be en-GB (British English). These terms are written to the myDoc.glstex file, which is input by the first resource command on the next LaTeX run.
The second command selects all the terms defined in constants.bib and sorts them according to en-reverse (reverse English, that is, Z–A) and writes them to myDoc-1.glstex, which is input by the second resource command.
The third command selects all the terms defined in abbreviations.bib and sorts them according to my locale and writes them to myDoc-2.glstex, which is input by the third resource command.
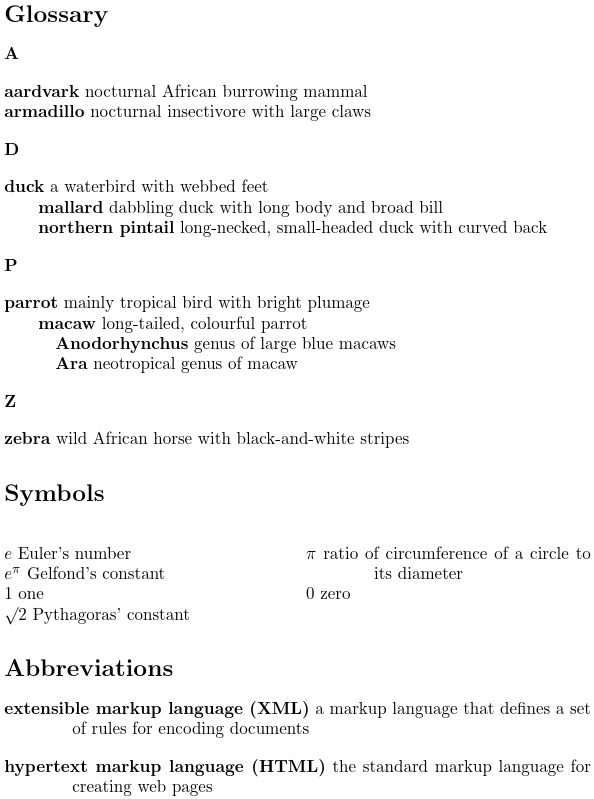
Remember that \printunsrtglossary simply iterates over all entries in the order in which they are defined (via commands like \longnewglossaryentry or \newabbreviation, not the order in which they are defined in the bib files). This results in the order: (first glstex file) aardvark and armadillo (both assigned to the “A” letter group), duck (assigned to the “D” letter group) followed by its child entries, parrot (assigned to the “P” letter group) followed by its descendants, zebra (assigned to the “Z” letter group) then (second glstex file) zero (assigned to the “Z” letter group), π (assigned to the “R” letter group), Pythagoras’ constant (assigned to the “P” letter group), one (assigned to the “O” letter group), Gelfond’s constant (assigned to the “G” letter group), and Euler’s number (assigned to the “E” letter group) then (third glstex file) extensible markup language (assigned to the “E” letter group) and hypertext markup language (assigned to the “H” letter group).
Note that there’s no visual indication between the sub-blocks. The “Z” letter group contains zebra from the end of the first sub-block and zero from the start of the second sub-block. The “E” letter group contains Euler’s number from the end of the second sub-block and extensible markup language from the start of the third sub-block. Note also that there are two “P” letter groups: one from the first sub-block and the other from the second.
This is a contrived example. It’s more typical to use multiple resource commands to process multiple glossaries that require different settings or to gather together all entries in a sub-block into a custom group. (See also Logical Glossary Divisions (type vs group vs parent).)
The following modification demonstrates custom groups:
\documentclass{article}

\usepackage[record,stylemods,style=indexgroup]{glossaries-extra}

\setabbreviationstyle{long-short-desc}
\GlsXtrLoadResources[src={entries},selection=all]

\glsxtrsetgrouptitle{cons}{Mathematical Constants}

\GlsXtrLoadResources[src={constants},
 group=cons,% group label
 symbol-sort-fallback=description,
 selection=all]

\glsxtrsetgrouptitle{abbrvs}{Abbreviations}

\GlsXtrLoadResources[src={abbreviations},
 group=abbrvs,% group label
 abbreviation-sort-fallback=long,
 selection=all]

\begin{document}
\printunsrtglossary
\end{document}
This assigns the constants to a group labelled cons with the title “Mathematical Constants” and assigns the abbreviations to a group labelled abbrvs with the title “Abbreviations”.

Multiple Glossaries
The following demonstrates multiple glossaries:
\documentclass{article}

\usepackage[abbreviations,symbols,record,stylemods=mcols]{glossaries-extra}

\setabbreviationstyle{long-short-desc}
\GlsXtrLoadResources[src={entries},selection=all]

\GlsXtrLoadResources[src={constants},
 type=symbols,
 symbol-sort-fallback=description,
 selection=all]

\GlsXtrLoadResources[src={abbreviations},
 type=abbreviations,
 abbreviation-sort-fallback=long,
 selection=all]

\begin{document}
\printunsrtglossary[style=indexgroup]
\printunsrtglossary[type=symbols,style=mcolindex,nogroupskip]
\printunsrtglossary[type=abbreviations,style=index]
\end{document}
This uses the abbreviations and symbols package options to create the additional glossaries. Note that the use of multiple glossaries means that I can apply a different style to each glossary. (The stylemods=mcols option indicates to load glossary-mcols.sty as well as loading glossaries-extra-stylemods.sty.) The mcolindex style doesn’t display the group headings but it does still create a vertical gap with \glsgroupskip. I’ve added the nogroupskip option to suppress it. The index style likewise doesn’t show the group heading but does create a vertical gap. I haven’t used the nogroupskip option for the abbreviations glossary so the inter-group gap is visible.
The type=abbreviations resource option wasn’t actually necessary in the above example. Entries defined in the bib file with @abbreviation are written to the glstex file using the provided command:
\providecommand{\bibglsnewabbreviation}[4]{%
  \newabbreviation[#2]{#1}{#3}{#4}%
}
Note that this uses \newabbreviation which automatically assigns the entry to the “abbreviations” glossary if the abbreviations package option is used. This means that both the main glossary and the abbreviations can be processed in one resource command:
\GlsXtrLoadResources[
 src={entries,abbreviations},
 abbreviation-sort-fallback=long,
 selection=all]
This only needs to be split into two resource commands if there are conflicting settings. For example, suppose I want bib2gls to ignore the description fields in the abbreviations.bib file but not the entries.bib file. Then I would need:
\GlsXtrLoadResources[src={entries},selection=all]

\setabbreviationstyle{long-short}
\GlsXtrLoadResources[src={abbreviations},
 ignore-fields={description},
 selection=all]
Categories
In an earlier post I mentioned categories, which can be assigned using the category key. It’s possible to assign this key using the resource command with the same name. For example, I could make all my entries in the constants.bib file have the category “symbol” like this:
\GlsXtrLoadResources[src={constants},
 type=symbols,
 category=symbol,
 symbol-sort-fallback=description,
 selection=all]
Alternatively I could use category={same as entry}, which would make the category the same as the bib entry type without the leading @ (in this case number), or category={same as type}, which would make the category the same as the type (in this case symbols), or category={same as base}, which would make the category the same as the basename of the bib file without the .bib extension (in this case constants).
The other post described how to define a post-link category hook using \glsdefpostlink. This allows additional content to be added after commands like \gls for a particular category. There’s a similar hook that’s implemented after the description is displayed with the standard glossary styles.
\glsdefpostdesc{category}{definition}
This is something you can also use with makeindex and xindy, but the bib2gls resource options make it easier to change the category for specific documents without having to alter the entry definition.
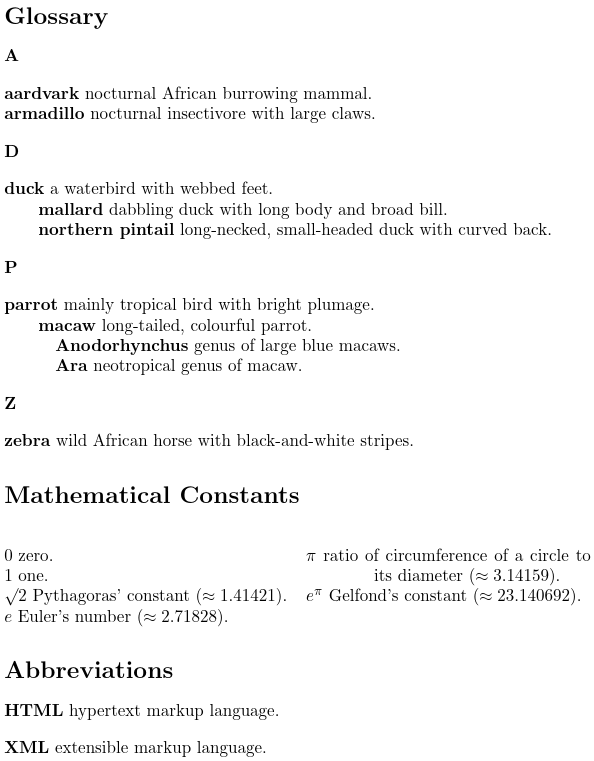
Some of the terms defined in constants.bib have the user1 field set to the approximate numerical value. Assigning a category and post-description hook makes it easy to display this value in the glossary. Note that the post-description hook comes before the punctuation inserted with the postdot or postpunc package options.
\documentclass{article}

\usepackage[postdot,abbreviations,symbols,record,stylemods={mcols}]{glossaries-extra}

\GlsXtrLoadResources[src={entries},selection=all]

\glsdefpostdesc{number}{%
 \glsxtrifhasfield{useri}{\glscurrententrylabel}%
 {\space ($\approx\glscurrentfieldvalue$)}{}%
}

\GlsXtrLoadResources[src={constants},
 type=symbols,
 category={same as entry},
 symbol-sort-fallback=description,
 selection=all]

\setabbreviationstyle{long-short}
\GlsXtrLoadResources[src={abbreviations},
 ignore-fields={description},
 selection=all]

\begin{document}
\printunsrtglossary[style=indexgroup]
\printunsrtglossary[type=symbols,style=mcolindex,nogroupskip]
\printunsrtglossary[type=abbreviations,style=index]
\end{document}

For example, Euler’s number is now followed by “ (≈2.71828)”. The closing full stop (automatically inserted by the postdot package option) comes after the parenthetical material. Note that zero and one don’t have the user1 field set as the value given in the name field is the exact numerical value.
Numeric Sorting
There are some numerical sorting methods available to use with bib2gls, such as sort=integer for integers or sort=double for double-precision floating point values. For locale-sensitive numbers (that include thousand separators) you need to use sort=numeric or sort=numberformat instead. Let’s suppose that I now want the mathematical constants ordered according to their approximate value. As before I can use symbol-sort-fallback to change the fallback field to user1, but that will leave a blank sort value for zero and one, which don’t have that field set.
With bib2gls version 2.7 or above, I can use the field concatenation operator symbol-sort-fallback=user1+name. This will construct the sort fallback value from a combination of the user1 value and the name. This means that, for example, Euler’s number will have the sort value 2.71828 \ensuremath{e} and “one” will have the sort value \ensuremath{1}. The non-numeric content can then be stripped off using:
sort-replace={{[^0-9\string\.\string\-]+}{}}
The following is a modification of the previous example document. I’ve decided to provide my own custom glossary for the mathematical constants instead of using the one provided by the symbols package option for illustrative purposes.
\documentclass{article}

\usepackage[postdot,abbreviations,record,stylemods={mcols}]{glossaries-extra}

\GlsXtrLoadResources[src={entries},selection=all]

\glsdefpostdesc{number}{%
 \glsxtrifhasfield{useri}{\glscurrententrylabel}%
 {\space ($\approx\glscurrentfieldvalue$)}{}%
}

\newglossary*{constants}{Mathematical Constants}

\GlsXtrLoadResources[src={constants},
 type=constants,
 category={same as entry},
 sort=double,
 symbol-sort-fallback=user1+name,
 sort-replace={{[^0-9\string\.\string\-]+}{}},
 selection=all]

\setabbreviationstyle{long-short}
\GlsXtrLoadResources[src={abbreviations},
 ignore-fields={description},
 selection=all]

\begin{document}
\printunsrtglossary[style=indexgroup]
\printunsrtglossary[type=constants,style=mcolindex,nogroupskip]
\printunsrtglossary[type=abbreviations,style=index]
\end{document}
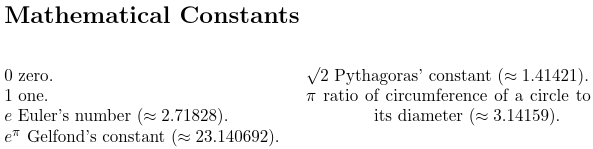
The list of mathematical constants is now ordered according to the associated numeric value: 0, 1, Pythagoras’ constant (1.41421), Euler’s number (2.71828), π (3.14159) and Gelfond’s constant (23.140692). Note that the main glossary and list of abbreviations are still ordered according to the locale-sensitive word sort method.
(If you decide to change the glossary label, you may need to delete the glstex files before you can rebuild the document.)
The TeX Parser Library
When determining the sort value, bib2gls uses the TeX Parser Library if the value contains any of the following symbols: \ { } or $. This library isn’t a proper TeX engine and has to interpret TeX fragments outside of the complete document code, but it does understand a limited number of commands and is able to convert some common kernel symbol commands into the closest matching Unicode character. It also has some limited understanding of a few packages, such as siunitx, pifont and upgreek. To find the complete list run bib2gls from the command line with the --list-known-packages switch:
bib2gls --list-known-packagesIf a command is unknown bib2gls will ignore it. This means that the sort value can end up empty if it originally consisted solely of unknown commands.
Suppose now I want the mathematical constants from the previous example to be ordered according to the name (symbol-sort-fallback=name). When sorting symbols, it’s better to use a character code comparator rather than the locale-sensitive word method (which can discard non-letters). In the example document below I’ve used sort=letter-case, which is a case-sensitive character code sort method.
\documentclass{article}

\usepackage[postdot,abbreviations,record,stylemods={mcols}]{glossaries-extra}

\GlsXtrLoadResources[src={entries},selection=all]

\glsdefpostdesc{number}{%
 \glsxtrifhasfield{useri}{\glscurrententrylabel}%
 {\space ($\approx\glscurrentfieldvalue$)}{}%
}

\newglossary*{constants}{Mathematical Constants}

\GlsXtrLoadResources[src={constants},
 type=constants,
 category={same as entry},
 sort=letter-case,
 symbol-sort-fallback=name,
 selection=all]

\setabbreviationstyle{long-short}
\GlsXtrLoadResources[src={abbreviations},
 ignore-fields={description},
 selection=all]

\begin{document}
\printunsrtglossary[style=indexgroup]
\printunsrtglossary[type=constants,style=mcolindex,nogroupskip]
\printunsrtglossary[type=abbreviations,style=index]
\end{document}
The main glossary and list of abbreviations are still ordered according to the locale-sensitive word sort but the list of mathematical constants is now ordered according to the character code of the interpreted sort value.
The order is now: 0, 1, e (Euler’s number), e𝜋 (Gelfond’s constant), √2 (Pythagoras’ constant) and 𝜋 (pi). Note that 𝜋 is the Unicode character Mathematical italic small pi U+1D70B (rather than the Greek lowercase π U+03C0). The square root symbol √ is the Unicode character U+221A, so √ comes before 𝜋.
@preamble
As with bibtex, @preamble may be used in the bib file to provide commands that are used by one or more of the entries. The contents of @preamble are copied to the glstex file to ensure that the commands are defined in the document, but the contents are also supplied to the TeX parser library so that it can recognise those commands in the sort value, if required. The use of \providecommand to define the entries means that you can have an alternative definition in the document, but it must be defined before the glstex file is input.
For example, suppose I have a file called books.bib that contains the following:
@preamble{"\providecommand{\nameart}[2]{#2}"}

@index{thehobbit,
  name={\nameart{The}{Hobbit}}
}

@index{ataleoftwocities,
  name={\nameart{A}{Tale of Two Cities}}
}
This provides the command \nameart which ignores its first argument and just does the second. This means that the TeX parser library will interpret \nameart{The}{Hobbit} as simply “Hobbit”. A different definition can be provided in the document:
\documentclass{article}

\usepackage[record]{glossaries-extra}

\newcommand{\nameart}[2]{#1 #2}

\GlsXtrLoadResources[src=books,selection=all]

\begin{document}
\printunsrtglossary
\end{document}
This means that the articles “A” and “The” will be ignored when sorting. This results in the order: The Hobbit, A Tale of Two Cities because bib2gls only picks up the definition in @preamble not the one in the document.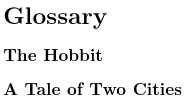
(@index is like @entry but doesn’t require a description. This can look a little odd when there’s no extra information, such as the location list.)
The @preamble can also be used to supply alternative definitions for commands provided by packages in the document that bib2gls doesn’t recognise. Suppose, for example, that I need to use commands provided by marvosym, such as \Email. These commands aren’t recognised by the TeX parser library and so will be ignored if they occur in the sort value. The @preamble can be used to provide definitions that expand to the closest matching Unicode character. If \providecommand is used it won’t override the definition provided by marvosym.
For example, I could create a file called pictographs.bib that contains:
@preamble{"\providecommand{\Email}{\symbol{"1F584}}
\providecommand{\Letter}{\symbol{"1F582}}
\providecommand{\Mobilefone}{\symbol{"1F581}}
\providecommand{\Telefon}{\symbol{"1F57F}}"
}

@symbol{email,
  name={\Email},
  description={email}
}

@symbol{envelope,
  name={\Letter},
  description={letter}
}

@symbol{phone,
  name={\Mobilefone},
  description={mobile phone}
}

@symbol{landline,
  name={\Telefon},
  description={telephone}
}
The document can then sort the name by character code:
\documentclass{article}

\usepackage{marvosym}
\usepackage[record]{glossaries-extra}

\GlsXtrLoadResources[src=pictographs,
  sort=letter-case,
  symbol-sort-fallback=name,
  selection=all
]

\begin{document}
\printunsrtglossary
\end{document}
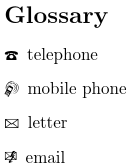
The list is now in the order 🕿 (U+1F57F) telephone, 🖁 (U+1F581) mobile phone, 🖂 (U+1F582) letter, 🖄 (U+1F584) email.
If there’s a possiblity that the contents of @preamble may cause a problem if they are copied into the glstex file, you can prevent the contents from being written using the write-preamble=false resource option. The contents will still be provided to the TeX parser library. If you want to prevent the contents from being interpreted use the interpret-preamble=false option.