In this short paper, we will discover a new perspective of using gnuplot within our TeX documents through the gnuplottex package or directly from your compilation workflow. This task is eased by the use of arara, a TeX automation tool.
This article is available for reading and for download in pdf format.
1. Prologue
It’s been a while since I used gnuplot for the first time. My friend and I were playing with a program to generate lottery numbers based on a huge amount of data from the Brazilian lottery history. At the end of the day, we had to plot all data we had collected; someone suggested gnuplot. I was shocked: with two or three lines of code, the plot was generated, with an astounding quality.
At some point, in academia or market, we need to deal with plotting. It’s a very useful artifact, either for illustrating your research paper, or when presenting the profit increase in a meeting with your boss. Numbers are an abstract concept, plots are a concrete representation of them! How does one plot data? For us TeXers, we have several options. Recently, the emerging and powerful TikZ/pgf packages are widely used for this purpose. I myself use them once in a while, but sometimes I think the brave gnuplot – my first successful plotting experience – should also be remembered.
Either with the very own gnuplot program via \write18 or using the cool gnuplottex package, we need to enable TeX to make external calls. It’s a known fact that relying on external tools from TeX requires for us to enable the shell-escape feature. In my humble opinion, we can’t take the risk of making it a global change – think of a “harmless” document which calls the line in this post on askubuntu.com. On the other hand, it might be boring to set up a certain profile every time you need this feature.
gnuplot can output to several formats, including eps, an acronym of Encapsulated PostScript. If we include an .eps image in our TeX document and compile it with pdflatex, thanks to the restricted list of allowed external tools, the image will be converted to .pdf beforehand without any trouble. Sadly, if you have a very restricted environment or if the policy is to disable every external call – say, with --no-shell-escape – the conversion won’t be possible and thus the document compilation will fail. You will need to rely on the latex -> dvips -> ps2pdf compilation chain in order to get a proper pdf file. Writing a Makefile might help in Linux and Mac, but Windows users might have troubles. Worse, .bat files might not be the best approach in this case.
In order to ease the compilation workflow, and heavily inspired by the existing programs, I decided to write my own automation tool. The result of this adventure is arara, a “personal assistant” written for the sole purpose of enhancing the TeX experience. Apologies for tooting my own horn, but I really hope you enjoy arara the same way I do. Let the fun begin.
2. The bird takes flight
Arara is the Brazilian name of a macaw bird. Have you ever watched the movie Rio? The protagonist is a blue arara, or as we say in Brazil, a cute ararinha-azul. The word arara comes from the Tupian word a’rara, which means big bird.
The parrot belongs to the same family of the arara. Have you ever talked to a parrot? They are able to learn and reproduce words. Maybe I could establish an analogy between arara – the software – and a parrot. Let’s see how it works.
arara is a TeX automation tool. But maybe not in the traditional sense, such as existing tools like latexmk and rubber. As I said in the previous section, think of arara as a personal assistant. It is as powerful as you want it to be. How do you make a parrot talk? You need to teach it. The very same way happens with arara: the software will execute what you tell it to execute. How will arara do this? Easy: you need to teach it.
How would you compile a sample mydoc.tex in rubber, for instance? It’s quite easy, a simple rubber --pdf mydoc would do the trick. Now, if you try arara mydoc, I’m afraid nothing will be generated; arara doesn’t know what to do with your file. You need to tell it.
Long story short: you are in control of your documents. arara won’t do anything unless you teach it how to do a task and explicitly tell it to execute the task. How can I teach arara to do a task? Not with a cookie, but defining rules. Once arara knows how to do stuff, you can easily tell it to execute a certain task by using directives.
I don’t want to make this paper a boring introduction to arara, so I invite the reader to take a look in the user manual. I’m currently working in the new 2.0 version with some enhancements and – hopefully – a universal installer. The manual might be outdated, but the concepts are basically the same. I’ll update it too as soon as possible.
3. Plotting
First of all, let’s try a simple example with the gnuplottex package. Consider the Code 3.1 for our first TeX document. The gnuplot code is extracted from the official documentation. Run with pdflatex mydoc.
\documentclass{article}

\usepackage{gnuplottex}

\begin{document}

\begin{gnuplot}[terminal=pdf]
set key inside left top vertical Right noreverse enhanced autotitles box linetype -1 linewidth 1.000
set samples 400, 400
plot [-10:10] real(sin(x)**besj0(x))
\end{gnuplot}

\end{document}
Code 3.1 Our first example with gnuplottex
Certainly we will get the warning shown in Code 3.2.
Package gnuplottex Warning: Please convert mydoc-gnuplottex-fig1.gnuplot manually.
Code 3.2 Warning from the gnuplottex package
What does the warning mean? gnuplottex relies on the shell-escape feature in order to make the external call to gnuplot, create the plot and include it, according to the terminal output we set in the gnuplot environment (in our example, we used the pdf option, which will obviously generate a .pdf file).
Note that there is a file named mydoc-gnuplottex-fig1.gnuplot in the same folder of our .tex document. The content is actually the body of the gnuplot environment of our code (lines 8, 9 and 10 from Code 3.1). For every gnuplot environment in our .tex document, gnuplottex will write a file and then call gnuplot on it.
Let’s now fix our compilation by running pdflatex --shell-escape mydoc. Our new file mydoc.pdf will now contain a lovely plot produced by gnuplot, invoked under the hood by gnuplottex (Figure 1).
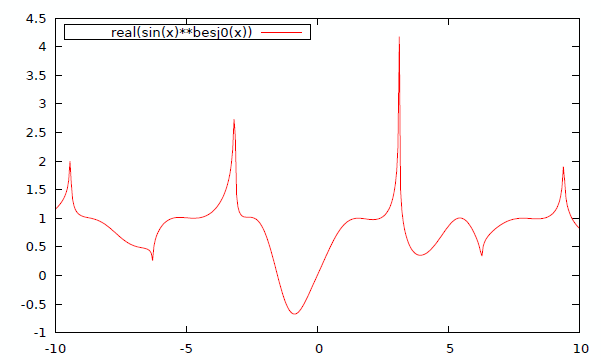
Figure 1 The generated plot
gnuplot has several output formats, such as PostScript, emf, svg, pdf, and png. For instance, let’s suppose we want to use PSTricks now instead of the pdf output (line 7 of Code 3.1). In order to achieve this, we have to replace pdf by pstricks in line 7, and add \usepackage{pstricks} to our document preamble. The new version is presented in Code 3.3.
\documentclass{article}

\usepackage{pstricks}
\usepackage{gnuplottex}

\begin{document}

\begin{gnuplot}[terminal=pstricks]
set key inside left top vertical Right noreverse enhanced autotitles box linetype -1 linewidth 1.000
set samples 400, 400
plot [-10:10] real(sin(x)**besj0(x))
\end{gnuplot}

\end{document}
Code 3.3 Our example with PSTricks
How should we compile our new version of mydoc.tex? Surely, pdflatex as it is will fail. Of course, xelatex --shell-escape mydoc works like a charm, but we do love going the complicated way, don’t we? Then we have to rely on the latex -> dvips -> ps2pdf compilation chain. in other words, we will have to execute the programs presented in Code 3.4 in the correct order.
$ latex --shell-escape mydoc
$ dvips mydoc.dvi
$ ps2pdf mydoc.ps
Code 3.4 Compilation chain for our example with \texttt{pstricks}.
It’s still too easy. What if we write our own myplot.gnu file with the plotting instructions (lines 8, 9 and 10 from Code 3.1) and call gnuplot on our file from our .tex document? Code 3.5 presents a new version of our example with our new requirements.
\begin{filecontents*}{myplot.gnu}
set terminal pdf
set output 'myplot.pdf'
set key inside left top vertical Right noreverse enhanced autotitles box linetype -1 linewidth 1.000
set samples 400, 400
plot [-10:10] real(sin(x)**besj0(x))
\end{filecontents*}

\immediate\write18{gnuplot myplot.gnu}

\documentclass{article}
\usepackage{graphicx}
\begin{document}
\includegraphics{myplot}
\end{document}
Code 3.5 Our example now calling gnuplot directly
We need to run pdflatex --shell-escape mydoc in order to work. What is happening in Code 3.5? First, a new file myplot.gnu is written to the filesystem; then there’s an external call to gnuplot passing the newly created file as parameter (line 9); since we defined the output to a file named myplot.pdf (line 3), this file will be generated from gnuplot; in the last step, the .pdf file previously generated will be included in our document (line 14).
We can also output a PSTricks code insted of pdf file, similarly to what we did in Code 3.3. Instead of myplot.pdf, we would have myplot.tex, full of PSTricks commands. Of course, \usepackage{pstricks} is required.
Bird seeds
I think it’s now time to play with arara. But before we proceed to our examples, we should create our rules. arara doesn’t do anything without its rules. That means you must write your own rules. On the plus side, your rules will instruct exactly what arara has to do for you. Sadly, I can’t cover all the terminology and syntax here – it’s a humble paper, not a full book – so I kindly suggest you to take a look in the arara user guide.
First of all, let’s create a rule for processing .tex files with pdflatex. The pdflatex rule is presented in Code 4.1. All plain rules have the .yaml extension.
!config
identifier: pdflatex
name: PDFLaTeX
command: 'pdflatex @{ action == "" ? "--interaction=nonstopmode" : "--interaction=@{action}" } @{shell} @{file}.tex'
arguments:
  - identifier: action
    flag: '@{value}'
  - identifier: shell
    flag: '@{ value.toLowerCase() == "yes" || value.toLowerCase() == "true" || value.toLowerCase() == "on" ? "--shell-escape" : "--no-shell-escape" }'
Code 4.1 The pdflatex.yaml file
The pdflatex rule (Code 4.1) is very simple: it will run pdflatex on the current file (unless of course you override the file value by using files: [...] in the directive). There are two possible parameters to the command: an action, which will define in which interaction mode pdflatex should run (if not set, the default value relies on nonstopmode), and shell, which expects a boolean value, in order to enable or disable the shell-escape mode. Note that the boolean value can be true/false, on/off, and yes/no, regardless of the capitalization.
The next rules to be created are latex (Code 4.2), dvips (Code 4.3), and ps2pdf (Code 4.4). These rules are simplified for this paper; feel free to write more robust rules for your arara setup.
!config
identifier: latex
name: LaTeX
command: 'latex @{ action == "" ? "--interaction=nonstopmode" : "--interaction=@{action}" } @{shell} @{file}.tex'
arguments:
  - identifier: action
    flag: '@{value}'
  - identifier: shell
    flag: '@{ value.toLowerCase() == "yes" || value.toLowerCase() == "true" || value.toLowerCase() == "on" ? "--shell-escape" : "--no-shell-escape" }'
Code 4.2 The latex.yaml file
!config
identifier: dvips
name: DVIPS
command: 'dvips @{file}.dvi'
arguments: []
Code 4.3 The dvips.yaml file
!config
identifier: ps2pdf
name: PS2PDF
command: 'ps2pdf @{file}.ps'
arguments: []
Code 4.4 The ps2pdf.yaml file
Those rules are very simple. The latex rule acts just like pdflatex, with the very same parameters; both dvips and ps2pdf rules have no parameters.
Now it’s time for us to create a gnuplot rule. The gnuplot command is very straightforward and doesn’t require a complicated setup. We can safely create the rule presented in Code 4.5.
!config
identifier: gnuplot
name: GNUPlot
command: 'gnuplot @{file}'
arguments: []
Code 4.5 The gnuplot.yaml file.
The effectiveness of the rules will be seen when we call them from the arara directives within the .tex document. For now, make sure these rules are saved in $ARARA_HOME/rules/plain (where $ARARA_HOME$ is the directory where you deployed arara ). Now that we have the bird seeds, let’s give them to arara.
Back to the examples
Now that we have five arara rules, we can revisit our examples and slightly modify them. In fact, only the third example (Code 3.5) will need an actual modification; the other two will only require the arara directives.
A directive is a special comment in the .tex file which will tell arara how it should execute a certain task. A directive can have as many parameters as its corresponding rule has. You can insert as many directives as you want, and in any position of the .tex file; arara will read the whole file and extract the directives accordingly. A directive should be placed in a line of its own, in the form % arara: <directive>. Directives are always mapped to rules.
First of all, let’s run arara without any parameters (Code 5.1). While writing this paper, I used the 2.0RC1 version of arara . I hope to make it final and release it in a few days.
$ arara
  __ _ _ __ __ _ _ __ __ _
 / _` | '__/ _` | '__/ _` |
| (_| | | | (_| | | | (_| |
 \__,_|_|  \__,_|_|  \__,_|

Arara 2.0RC1 - The cool TeX automation tool
Copyright (c) 2012, Paulo Roberto Massa Cereda
All rights reserved.

usage: arara [ file [ --log ] [ --verbose ] [ --timeout N ] | --help |
             --version ]
 -h,--help            print the help message
 -l,--log             generate a log output
 -t,--timeout    set the execution timeout (in milliseconds)
 -v,--verbose         print the command output
 -V,--version         print the application version
Code 5.1 Running arara in the terminal.
By default, arara will run in silent mode, displaying only the status of the current task. Please note that if any command requires user input, arara will interrupt it, since it’s running in silent mode. If you want to see the whole execution process, including interacting in a possible user input, use the --verbose flag.
You might ask how arara knows if the command was successfully executed. The idea is quite simple: good programs like pdflatex make use of a concept known as exit status. In short, when a program had a normal execution, the exit status is zero. Other values are returned when an abnormal execution happened. When pdflatex successfully compiles a .tex file, it returns zero, so arara intercepts this number. Again, it’s a good practice to make command line applications return a proper exit status according to the execution flow, but beware: you might find applications or shell commands that don’t feature this control (in the worst case, the returned value is always zero).
Back to our examples, let’s see how our first attempt (Code 3.1) is rewritten with the proper arara directives (Code 5.2). The execution is presented in Code 5.3.
% arara: pdflatex: { shell: on }
\documentclass{article}

\usepackage{gnuplottex}

\begin{document}

\begin{gnuplot}[terminal=pdf]
set key inside left top vertical Right noreverse enhanced autotitles box linetype -1 linewidth 1.000
set samples 400, 400
plot [-10:10] real(sin(x)**besj0(x))
\end{gnuplot}

\end{document}
Code 5.2 Our first example with gnuplottex using the arara directives
$ arara mydoc
  __ _ _ __ __ _ _ __ __ _
 / _` | '__/ _` | '__/ _` |
| (_| | | | (_| | | | (_| |
 \__,_|_|  \__,_|_|  \__,_|

Running PDFLaTeX... SUCCESS
Code 5.3 Our first example compiled with arara
The .pdf file is correctly generated. A big advantage of using arara is that you define the compilation worflow in your source code, not in the terminal. If you are able to write platform-independent rules – like the ones we wrote in this paper – you can run the .tex file with arara under Windows and obtain the very same result. Of course, in this particular case, gnuplot is a requirement in the underlying operating system; arara will issue an error if the command is not found. Now let’s try our second attempt (Code 3.3) rewritten with the proper arara directives (Code 5.4). The execution is presented in Code 5.5.
% arara: latex: { shell: on }
% arara: dvips
% arara: ps2pdf
\documentclass{article}

\usepackage{pstricks}
\usepackage{gnuplottex}

\begin{document}

\begin{gnuplot}[terminal=pstricks]
set key inside left top vertical Right noreverse enhanced autotitles box linetype -1 linewidth 1.000
set samples 400, 400
plot [-10:10] real(sin(x)**besj0(x))
\end{gnuplot}

\end{document}
Code 5.4 Our second example with PSTricks using the arara directives
$ arara mydoc
  __ _ _ __ __ _ _ __ __ _
 / _` | '__/ _` | '__/ _` |
| (_| | | | (_| | | | (_| |
 \__,_|_|  \__,_|_|  \__,_|

Running LaTeX... SUCCESS
Running DVIPS... SUCCESS
Running PS2PDF... SUCCESS
Code 5.5 Our second example compiled with arara
As we can easily see in the Code 5.5, arara does the latex -> dvips -> ps2pdf compilation chain for us. We just needed to provide the needed commands in the form of arara directives and nothing else. Note that the shell: on option in the latex directive (line 1) means that shell-escape should be enabled for latex in that specific step. For our third attempt (Code 3.4), we require a modification in the new code (Code 5.6). arara starts the compilation process by running pdflatex (line 1), but now there’s no call to gnuplot like we did in the original example; gnuplot is executed in the next step (line 2), processing the file defined in the files: [ myplot.gnu ] directive option. Because of this workflow, we added a conditional to our code in order to check if the proper .pdf already exists (line 8). This verification ensures that pdflatex won’t raise any errors in the first run (line 1), and that the plot will be included when pdflatex is called the second time (line 3). At the end of the arara execution, we’ll have our .pdf file correctly generated (Code 5.7).
% arara: pdflatex
% arara: gnuplot: { files: [ myplot.gnu ] }
% arara: pdflatex
\begin{filecontents*}{myplot.gnu}
set terminal pdf
set output 'myplot3.pdf'
set key inside left top vertical Right noreverse enhanced autotitles box linetype -1 linewidth 1.000
set samples 400, 400
plot [-10:10] real(sin(x)**besj0(x))
\end{filecontents*}

\documentclass{article}

\usepackage{graphicx}

\begin{document}
\IfFileExists{myplot.pdf}{\includegraphics{myplot}}{Moo.}
\end{document}
Code 5.6 Our third example calling gnuplot using the arara directives
$ arara mydoc
  __ _ _ __ __ _ _ __ __ _
 / _` | '__/ _` | '__/ _` |
| (_| | | | (_| | | | (_| |
 \__,_|_|  \__,_|_|  \__,_|

Running PDFLaTeX... SUCCESS
Running GNUPlot... SUCCESS
Running PDFLaTeX... SUCCESS
Code 5.7 Our third example compiled with arara
Final remarks
gnuplot is a powerful tool to create beautiful plots with a very clean syntax. It’s a viable option for articles and reports and a lightweight choice if you are not acquainted with TikZ/pgf or PSTricks. And maybe arara might help its use, making the whole process easier and more straightforward.
arara can be used in complex workflows, like theses and books. You can tell arara to compile the document, generate indices and apply styles, remove temporary files, compile other .tex documents, run MetaPost or MetaFont, create glossaries, call pdfcrop, gnuplot, move files, and much more. It’s up to you.
My humble software is available as an opensource project; contributions, suggestions, and even criticism are surely welcome. I really hope arara can enhance your TeX experience.
Acknowledgments
I’d like to thank all my friends from the TeX.sx community for helping me with my project. A special thanks goes to Marco Daniel for his contributions to arara .
Trivia
There’s also another motivation of the name arara : the chatroom residents of TeX.sx – including myself – are fans of palindromes, especially palindromic numbers. As you can already tell, arara is a palindrome.